
New and improved HM3 FAQ system:
https://kb.holdemmanager.com/
HM3 Start Screen / Landing Page FAQ:
https://kb.holdemmanager.com/knowledge-base/article/hm3-start-screen
[h1]
Welcome To Holdem Manager 3![/h1] You'll find everything you need to get started using Holdem Manager 3 here.
[h3]FAQ Links[/h3]
Installing Holdem Manager 3 (If you need help installing Holdem Manager 3)
Setup Poker Sites & Holdem Manager 3 (Use this to sync your poker site to Holdem Manager 3 so hands automatically import.)
Importing a PokerTracker 4 Database
[h3]Video Quick Start Guides[/h3]
We have video quick start guides for every part of Holdem Manager 3 too.
Fresh Install To HUD Working
HUD Troubleshooting
File Menu
Tools Menu
HUD (Heads-Up Display)
Reports
Report & HUD Filtering
Situational Views
Live Play Report
Replayer
Have a specific question? More than likely you will find the question and answer on our Video Guide FAQ page. Video Guide FAQ (Click Here)
You can always post questions in the Holdem Manager 3 Forums and our dedicated support staff will assist you.
Thanks for your interest in Holdem Manager 3 and we hope to see you at the tables soon!
New and improved HM3 FAQ system:
https://kb.holdemmanager.com/
Importing Hands FAQ:
https://kb.holdemmanager.com/knowledge-base/article/importing-hands
[h2]
There are three ways to import hands in Holdem Manager 3:[/h2]
[h1][anchor=new]Auto Importing New Hands while you are playing:[/anchor][/h1] In the top right of Holdem Manager 3 is a Start & Stop HUD Button. This tells Holdem Manager to Auto Import hands from your poker site.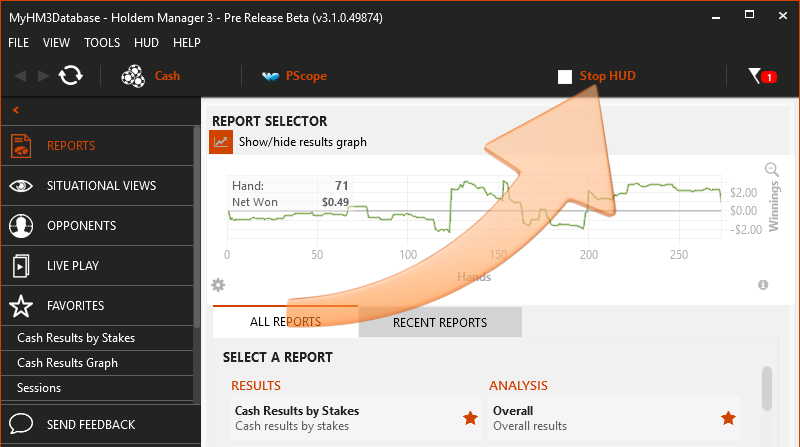
If your HUD is not being displayed or the Live Play Report is not updating when you play, review our Poker Site Setup FAQs or HUD TroubleShooting Video. [h2]
Holdem Manager 3 HUD[/h2]
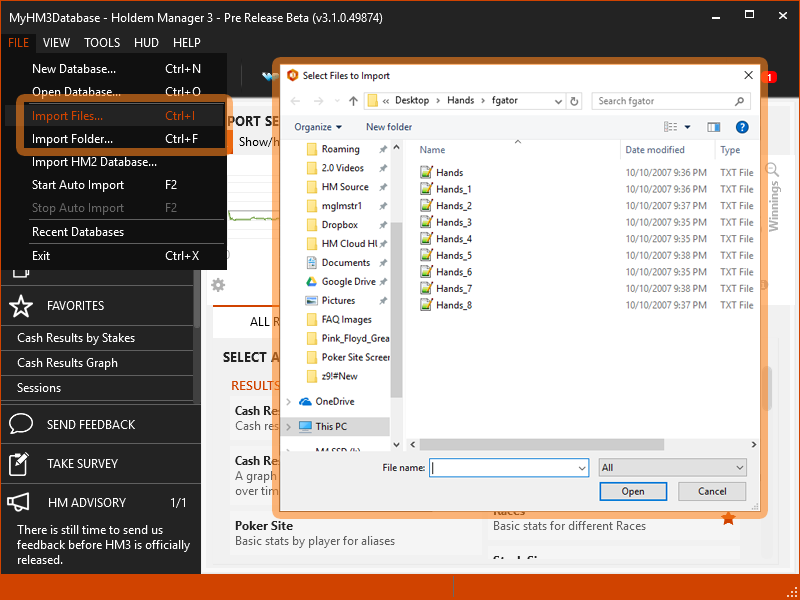
[h1][anchor=man]Manually Import Previously Played Hands:[/anchor][/h1] File > Import Files or File > Import Folder to manually import previously played hands.
Select the files or folder with hand histories to be imported. Holdem Manager will only display supported hand histories.
[h1][anchor=imp]Import Hands From HM2:[/anchor][/h1] HM3 can import all your data from your existing HM2 database. Please note that following the instructions below will import HM2 hands into the currently open HM3 database.

https://kb.holdemmanager.com/
Importing Hands FAQ:
https://kb.holdemmanager.com/knowledge-base/article/importing-hands
[h2]
There are three ways to import hands in Holdem Manager 3:[/h2]
- [url=#new]Auto Import New Hands[/url] - Imports hands as you play
- [url=#man]Manually Import Hands[/url] - Imports old hands
- [url=#imp]Import Hands From HM2[/url] - Imports hands directly from Holdem Manager 2
[h1][anchor=new]Auto Importing New Hands while you are playing:[/anchor][/h1] In the top right of Holdem Manager 3 is a Start & Stop HUD Button. This tells Holdem Manager to Auto Import hands from your poker site.
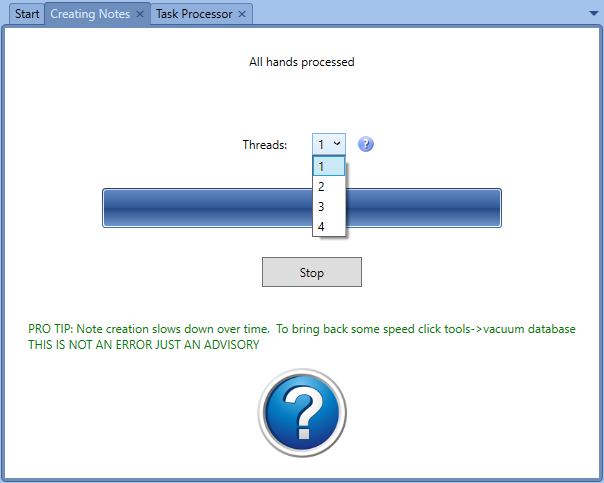
Note: The HUD must be running to Auto Import hands. If you see "Stop HUD" like the image below, your HUD is running and Holdem Manager is currently auto importing hands.
If your HUD is not being displayed or the Live Play Report is not updating when you play, review our Poker Site Setup FAQs or HUD TroubleShooting Video. [h2]
Holdem Manager 3 HUD[/h2]
[h1][anchor=man]Manually Import Previously Played Hands:[/anchor][/h1] File > Import Files or File > Import Folder to manually import previously played hands.
Select the files or folder with hand histories to be imported. Holdem Manager will only display supported hand histories.
HM3 now supports importing hand histories directly from .ZIP files.
[h1][anchor=imp]Import Hands From HM2:[/anchor][/h1] HM3 can import all your data from your existing HM2 database. Please note that following the instructions below will import HM2 hands into the currently open HM3 database.
- Go to File > Import HM2 Database…
- Select a HM2 Database from the Import From: drop-down.
- Hero only hands will only import hands that have hero hole cards.
- Date Range allows you to specify exact dates of hands to import
- Select the Import button to import the database
- After the import and tournament detection finishes you should also run the new Tools - 'Import HM2 Tournament Results...' if your HM2 database had any tournaments that you had manually edited the results of.
New and improved HM3 FAQ system:
https://kb.holdemmanager.com/
Advanced Install Setup Wizard FAQ:
https://kb.holdemmanager.com/knowledge-base/article/setup-wizard-advanced-install
The Advanced Holdem Manager 3 Installation is intended for users who have used poker tracking software in the past. If you have never used poker tracking software, use the Express Installation option. Express Install Guide (Click Here)
[h1]Download Holdem Manager 3 (Click Here)[/h1]
[h1][anchor=1]1. Welcome[/anchor][/h1]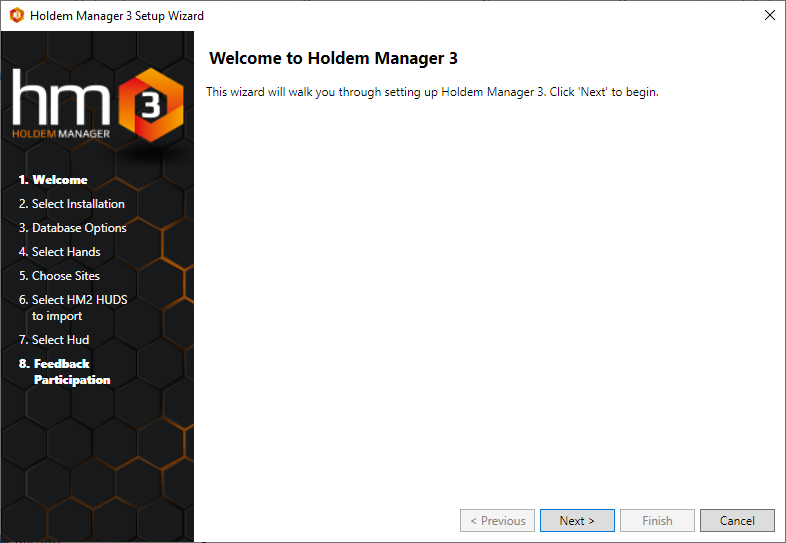
[h1][anchor=2]2. Select Installation[/anchor][/h1]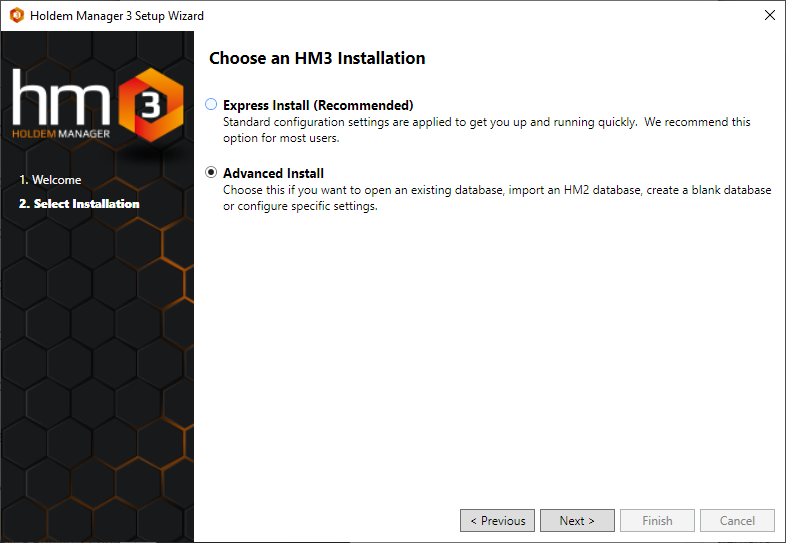
Select Advanced Install,
[h1][anchor=3]3. Database Options[/anchor][/h1]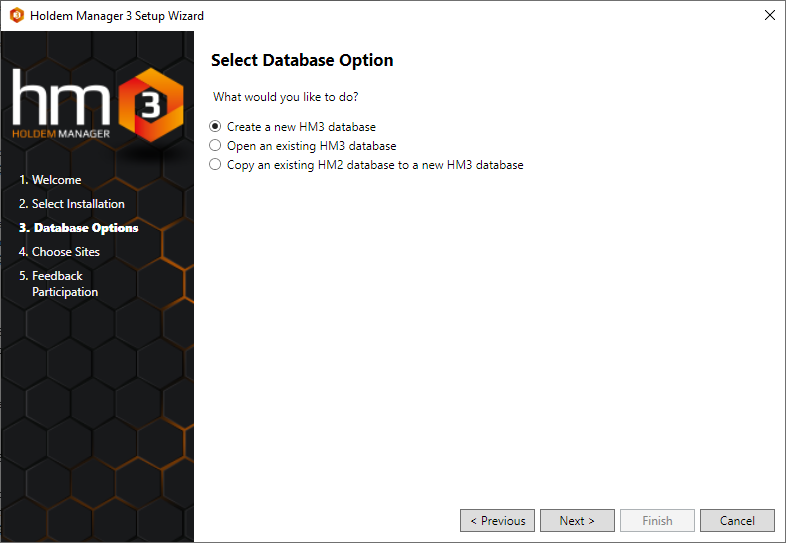
[h2][url=#4]Click Here if you chose to copy an HM2 database to a new HM3 database[/url][/h2]
[h1][anchor=3-1]Create New HM3 Database[/anchor]
 [/h1]
[/h1]
[h1][anchor=3-2]Open an existing HM3 database[/anchor][/h1]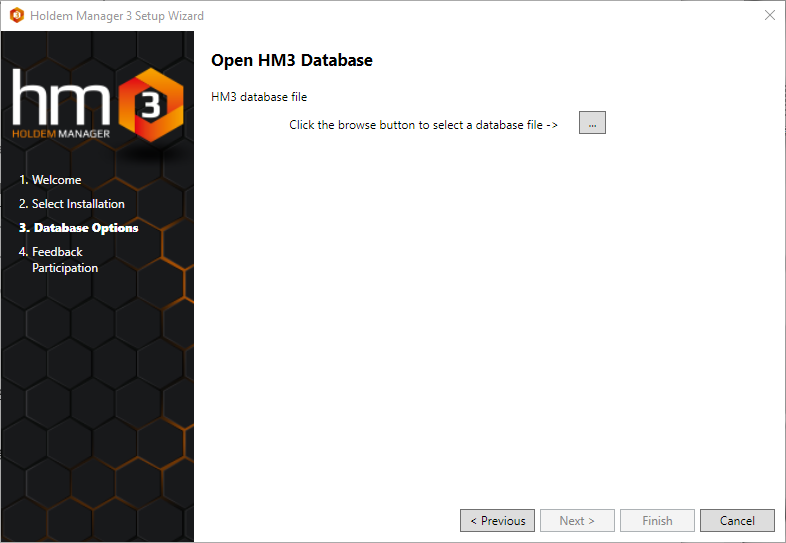
[h1][anchor=4]4. Select Hands - Import HM2 Database[/anchor][/h1] [h1]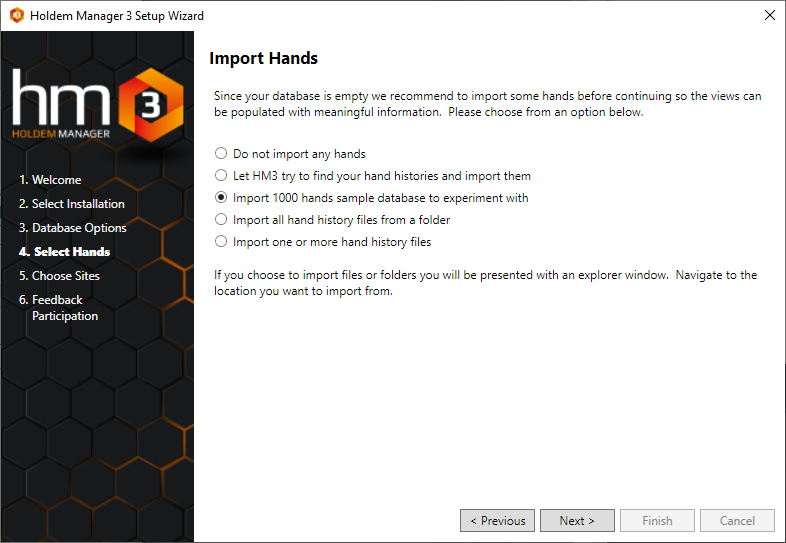 [/h1]
[/h1]
[h1][anchor=5]5. Choose Sites[/anchor][/h1]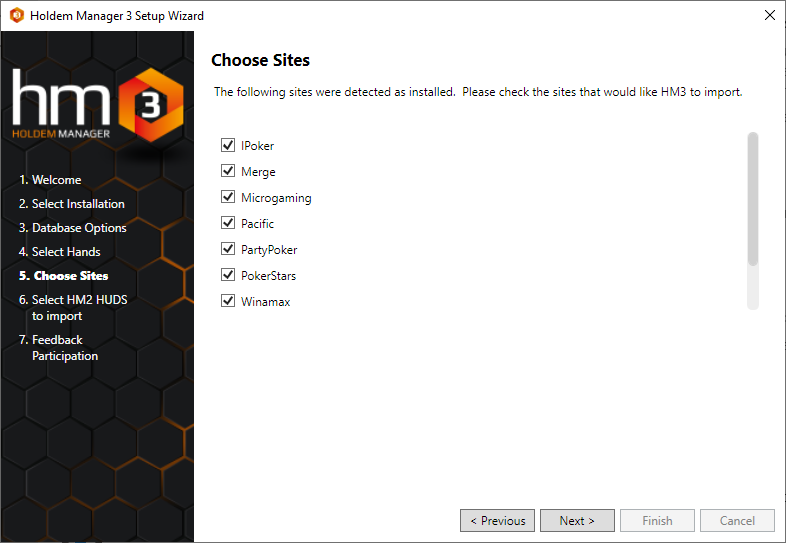
[h1][anchor=6]6. Select HM2 HUDs To Import[/anchor][/h1]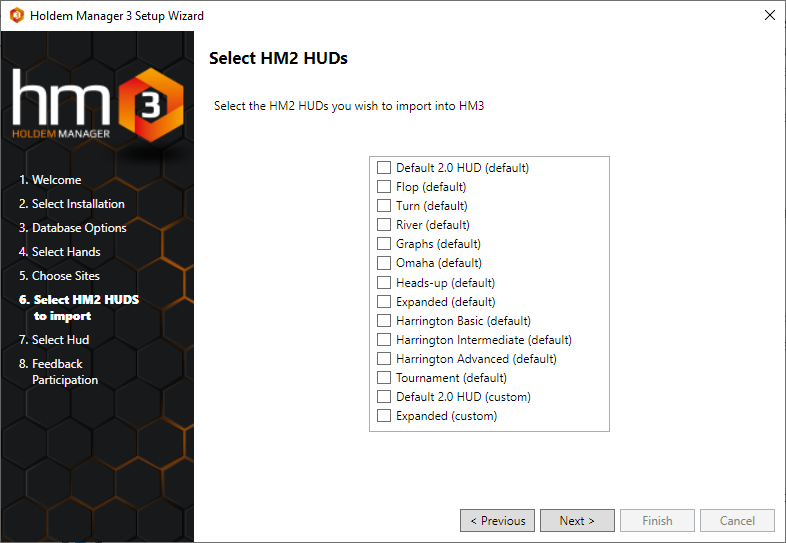
[h1][anchor=7]7. Select HUD[/anchor][/h1]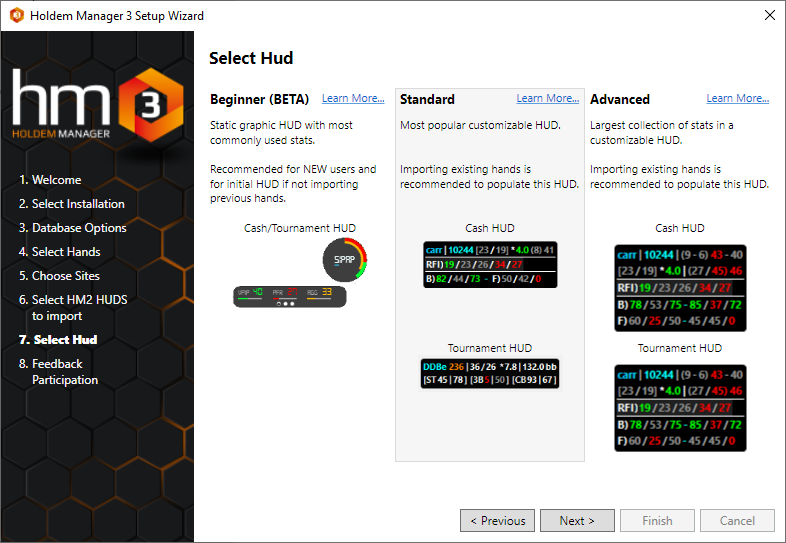
Select the Beginner, Standard or Advanced HUD. This will automatically make these HUD's your default HUD's for all table types. You can always change your HUD in Holdem Manager 3 as well.
[h1][anchor=8]8. Feedback Participation[/anchor][/h1]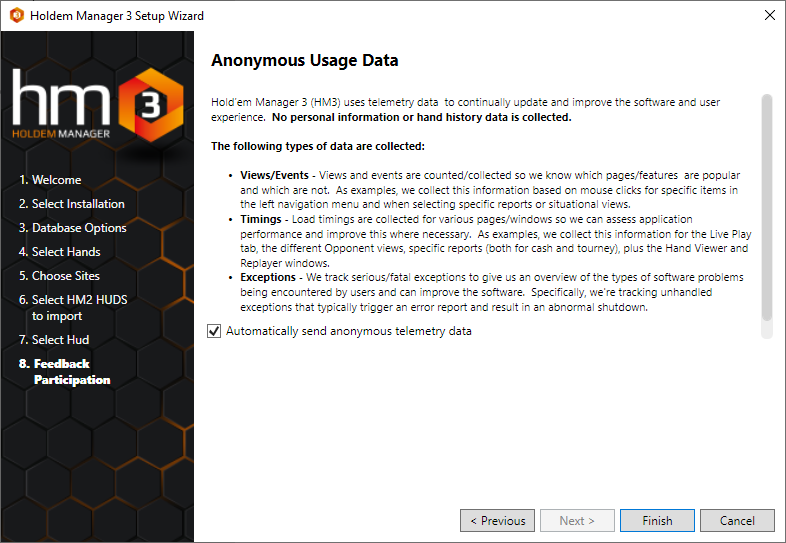
https://kb.holdemmanager.com/
Advanced Install Setup Wizard FAQ:
https://kb.holdemmanager.com/knowledge-base/article/setup-wizard-advanced-install
The Advanced Holdem Manager 3 Installation is intended for users who have used poker tracking software in the past. If you have never used poker tracking software, use the Express Installation option. Express Install Guide (Click Here)
This guide lists out all the Advanced Install steps. Depending on the options you choose in Step 3 Database Options and Step 4 Select Hands, some of the installation options past Step 3 Database Options might be removed or skipped.
[h1]Download Holdem Manager 3 (Click Here)[/h1]
- [url=#1]Welcome[/url]
- [url=#2]Select Installation[/url]
- [url=#3]Database Options[/url]
- [url=#4]Select Hands[/url]
- [url=#5]Choose Sites[/url]
- [url=#6]Select HM2 HUD's To Import[/url]
- [url=#7]Select HUD[/url]
- [url=#8]Feedback Participation[/url]
[h1][anchor=1]1. Welcome[/anchor][/h1]
[h1][anchor=2]2. Select Installation[/anchor][/h1]
Select Advanced Install,
[h1][anchor=3]3. Database Options[/anchor][/h1]
- Create a new HM3 database - Creates a new Holdem Manager 3 Database.
- Create a name for your database
- Select a location for your database. It is highly recommended you use the default location. DO NOT store a database in the Cloud or on a slow External Hard Drive, Holdem Manager 3 will not work in this configuration.
- Open an existing HM3 database - If you already have a Holdem Manager 3 Database and want to use it, select this option. You will need to know where your old HM3 database is to use it.
- By default, Holdem Manager 3 Databases are stored in your Documents folder on your hard drive.
- Default HM3 Database Location: C:\Users\{UserName}\Documents\Holdem Manager 3
- Copy an existing HM2 database to a new HM3 Database - This option allows you to import a HM2 database. Holdem Manager 3 will automatically find your HM2 PostgreSQL databases.
[h2][url=#4]Click Here if you chose to copy an HM2 database to a new HM3 database[/url][/h2]
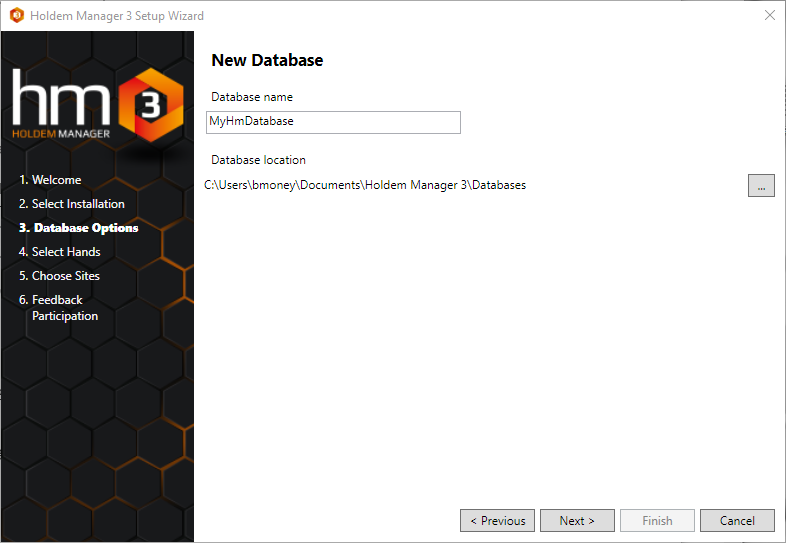
[h1][anchor=3-1]Create New HM3 Database[/anchor]
[/h1]
- Choose a database name.
- Select a database location.
- DO NOT select a database location in the cloud or on slow external hard drives. HM3 will not work in this configuration.
- Try to keep the database on your primary hard drive if at all possible!
[h1][anchor=3-2]Open an existing HM3 database[/anchor][/h1]
- Click the box with the three dots and locate your old HM3 database file.
- By default, HM3 databases are stored at: C:\Users\{UserName}\Documents\Holdem Manager 3\Databases
- Select the Holdem Manager 2 Database to import from the drop-down, choose to import Hero Only Hands or not, up to you. Then select a Date Range or leave it untouched to import hands from all dates. Click Next
- Enter a name for your database and click next.
[h1][anchor=4]4. Select Hands - Import HM2 Database[/anchor][/h1] [h1]
[/h1]
- Do not import any hands.
- Holdem Manager will not attempt to import any hands. Your database will be empty when HM3 starts for the first time.
- [url=#6]Goes to Step 6 - Select HM2 HUD's to Import[/url]
- Let HM3 try to find your hand histories and import them.
- HM3 will list out all poker sites it detects as installed on your computer and will automatically import hands from the poker site hand history folders.
- [url=#5]Goes to Step 5 - Choose Sites[/url]
- Import 1,000 hand sample database to experiment with.
- HM3 will import a 1,000 hand sample allowing you to use HM3 with no personal poker hands.
- [url=#6]Goes to Step 6 - Select HM2 HUD's to Import[/url]
- Import all hands history files from a folder.
- Opens a folder dialog window allowing you to select a folder where hand histories are stored.
- [url=#6]Goes to Step 6 - Select HM2 HUD's to Import[/url]
- Import one or more hand history files.
- Opens a folder dialog window allowing you to select a folder where hand histories are stored.
- [url=#6]Goes to Step 6 - Select HM2 HUD's to Import[/url]
[h1][anchor=5]5. Choose Sites[/anchor][/h1]
- Holdem Manager 3 has detected poker sites installed on your computer. Select all sites you want hand histories imported from.
- Holdem Manager will be reading your poker site configuration files here and automatically setting up auto import folders inside of HM3. This allows you to start playing right away with a HUD with no setup required.
[h1][anchor=6]6. Select HM2 HUDs To Import[/anchor][/h1]
- If Holdem Manager 2 was detected as installed on your computer, you can now select what HM2 HUD's to import for use in Holdem Manager 3.
[h1][anchor=7]7. Select HUD[/anchor][/h1]
Select the Beginner, Standard or Advanced HUD. This will automatically make these HUD's your default HUD's for all table types. You can always change your HUD in Holdem Manager 3 as well.
- Beginner
- This is the new Graphical HUD. Stats are limited and it's intended for players new to poker tracking software.
- Standard
- New for HM3 is the Standard HUD. The Standard HUD uses less stats than the Advanced HUD, but more stats than the Graphical HUD.
- Advanced
- New for HM3 is the Advanced HUD. The Advanced HUD lists out the most stats and will be the HUD serious grinders will start with.
[h1][anchor=8]8. Feedback Participation[/anchor][/h1]
- Opt in or out of anonymous telemetry data and click Finish.
New and improved HM3 FAQ system:
https://kb.holdemmanager.com/
What are the PC specs to run Holdem Manager 3 FAQ:
https://kb.holdemmanager.com/knowledge-base/article/what-are-the-pc-specs-to-run-holdem-manager-3
[h2]
Computer Hardware[/h2]
https://kb.holdemmanager.com/
What are the PC specs to run Holdem Manager 3 FAQ:
https://kb.holdemmanager.com/knowledge-base/article/what-are-the-pc-specs-to-run-holdem-manager-3
[h2]
Computer Hardware[/h2]
- Minimum Requirement: Intel Core i3 (or AMD equivalent) processor with 4GB of RAM.
- Recommended: Modern quad-core processor with 8GB of RAM or greater. This includes the Intel i5 processor lines (or their equivalent AMD processors).
- Optimal: Intel Core i7 multi-core 64-bit processor with 16GB of RAM or greater.
- Not Recommended: Intel Pentium 4, Atom, Core 2 Duo, or other low power processors such as ARM.
- Minimum Requirement: Windows 7, 8, 8.1 or 10.
- Recommended: Windows 10+
- Optimal: Windows 10 64bit
- The number one factor for speed performance is hard drive speed. Holdem Manager recommends at least a 7200RPM hard drive or faster. Solid State Drives (SSDs) are currently the fastest drives available for optimal performance.
Range Wizard is a Holdem Manager 3 app (PokerTracker support coming soon) that combines players with similar characteristics so you can analyze hand ranges and tendencies of various types of players. You define the type of player and which player tendencies you wish to study.
You can compare two different player types side by side to see how they differ. You can also compare your own tendencies against any player type.
With Range Wizard you can answer questions such as:
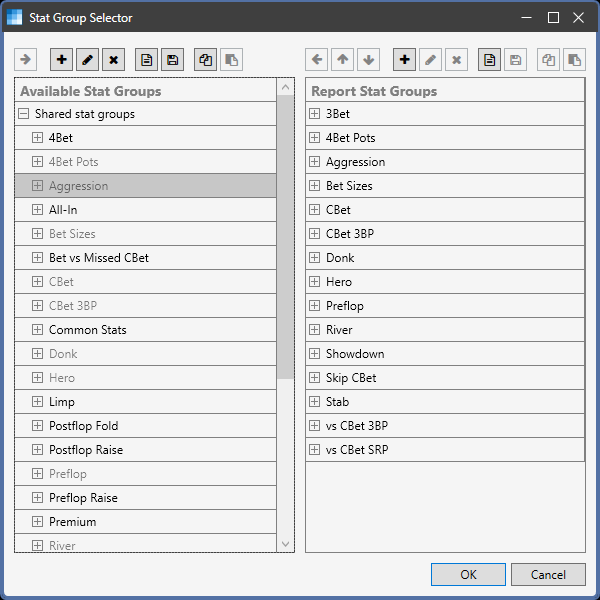
[Stat Group Selector]
Define filters that select the type of player you wish to study. You can define up to two different player types for side by side comparisons.
[Define player filter]
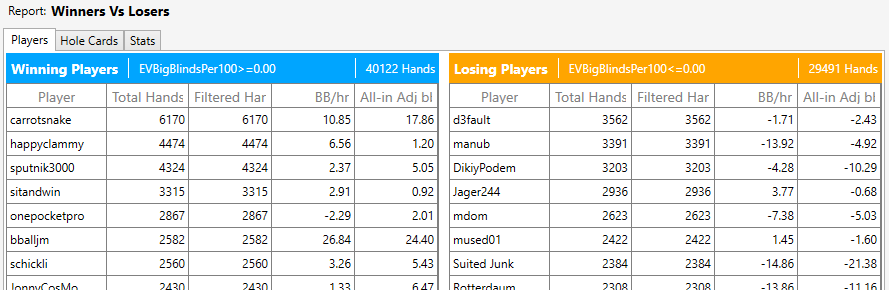
Range Wizard will scan your Holdem Manager 3 database to select the players with the most hands that match your player filter criteria.
[Filtered players]
Range Wizard will combine the matching players as if they were a single player and query the database for the tendencies you selected.
Range Wizard the hand range of various stats based on the hole cards that were shown down.
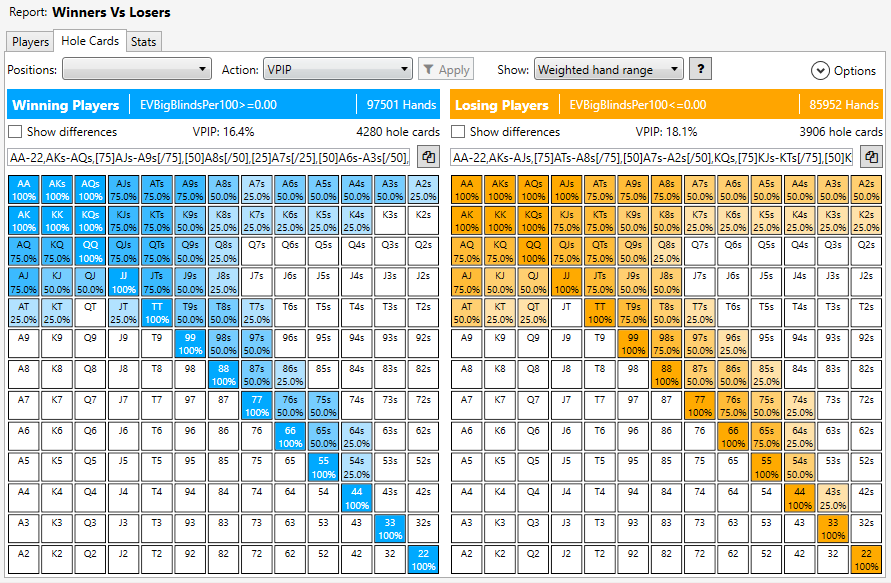
[Estimated hand ranges]
Range Wizard combines the stats you selected for all players and displays a report that makes it easy to study and compare player tendencies. Stats that show large differences are highlighted.
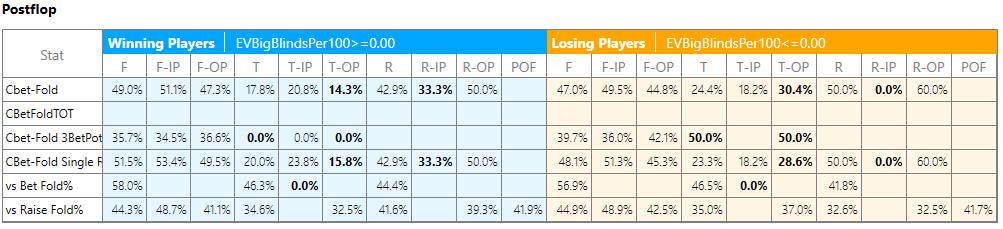
[Stats report]
You can drill down to see how individual stats vary within filtered players.
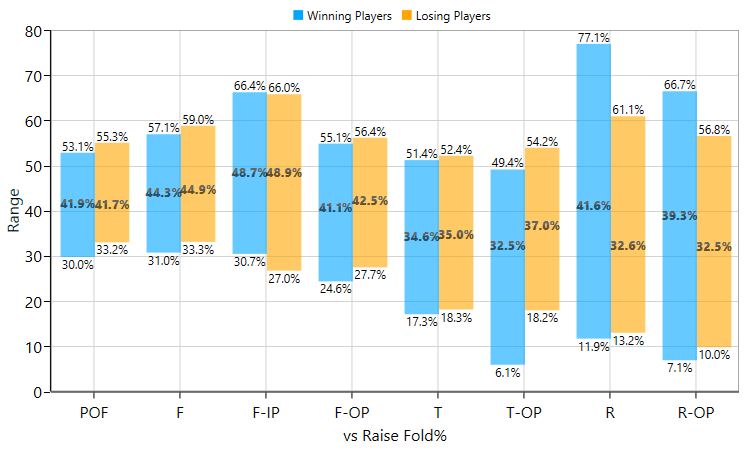
[Stat details]
Range Wizard provides several built in reports, stat groups, and view filters that make it easy to start analyzing and comparing different types of players.
You can compare two different player types side by side to see how they differ. You can also compare your own tendencies against any player type.
With Range Wizard you can answer questions such as:
- How do winning players play differently than losing players?
- What hand range does a loose aggressive player three bet you from the big blind?
- How do my hand ranges and stats compare to winning players?
- How do I study an opponent when I have only played a few hands against him?
[Stat Group Selector]
Define filters that select the type of player you wish to study. You can define up to two different player types for side by side comparisons.
[Define player filter]
Range Wizard will scan your Holdem Manager 3 database to select the players with the most hands that match your player filter criteria.
[Filtered players]
Range Wizard will combine the matching players as if they were a single player and query the database for the tendencies you selected.
Range Wizard the hand range of various stats based on the hole cards that were shown down.
[Estimated hand ranges]
Range Wizard combines the stats you selected for all players and displays a report that makes it easy to study and compare player tendencies. Stats that show large differences are highlighted.
[Stats report]
You can drill down to see how individual stats vary within filtered players.
[Stat details]
Range Wizard provides several built in reports, stat groups, and view filters that make it easy to start analyzing and comparing different types of players.
[h1]NoteCaddy Introduction[/h1]
[url=#nc-what-is-notecaddy]What is NoteCaddy?[/url]
[url=#nc-open-and-close]Opening and Closing NoteCaddy[/url]
[url=#NoteCaddy-PlayerOverview]NoteCaddy PlayerOverview[/url]
[url=#nc-how-to-add-nc-stats-to-hud]How Can I Add a NoteCaddy Stat to a HUD or Popup[/url]
[url=#nc-where-can-i-find-nc-notes]Where Can I Find NoteCaddy Notes[/url]
[url=#nc-types-of-stats]Types of NoteCaddy Stats[/url]
[url=#nc-add-nc-packs]How Can I Import NoteCaddy Notes or Coaching Packs?[/url]
[url=#nc-caddy-report]Caddy Report - What is it?[/url]
[url=#nc-why-so-much-cpu]Why is NoteCaddy Using so Much CPU?[/url]
[url=#The-NoteCaddy-Wiki]The NoteCaddy Wiki[/url]
[h3][anchor=nc-what-is-notecaddy]What is NoteCaddy?[/anchor][/h3] Opponent stats and notes can sometimes be overwhelming and we have a limited amount of time to process them. NoteCaddy solves this problem by deeply analyzing your hand histories and then combining all the data into a highly visual output.
Essentially NoteCaddy helps you absorb a lot of information in a short amount of time.
For Example:
Instead of trying to filter through 45 notes trying to find out what hands this opponent showed down when he 3bet on the BB vs the SB, NoteCaddy conveniently combines all that data into a concise note. NoteCaddy details the hole-card range (on the left), and on the right side the CaddySpark graph indicates how likely the hand is to be strong or weak when this player makes this action.

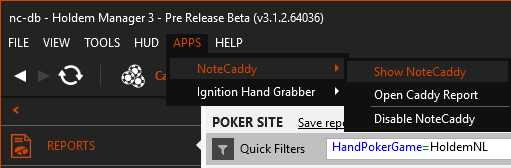
[h3][anchor=nc-open-and-close]Opening and Closing NoteCaddy[/anchor][/h3] To open the main NoteCaddy interface where you can create custom stats, badges, etc, click the Holdem Manager 3 Apps menu, then click Show NoteCaddy.
You can also disable NoteCaddy in this same menu.
[h3][anchor=NoteCaddy-PlayerOverview]NoteCaddy PlayerOverview[/anchor][/h3] The PlayerOverview contains the Main CaddyScatter Graph and notes that are eligible to be displayed on it.

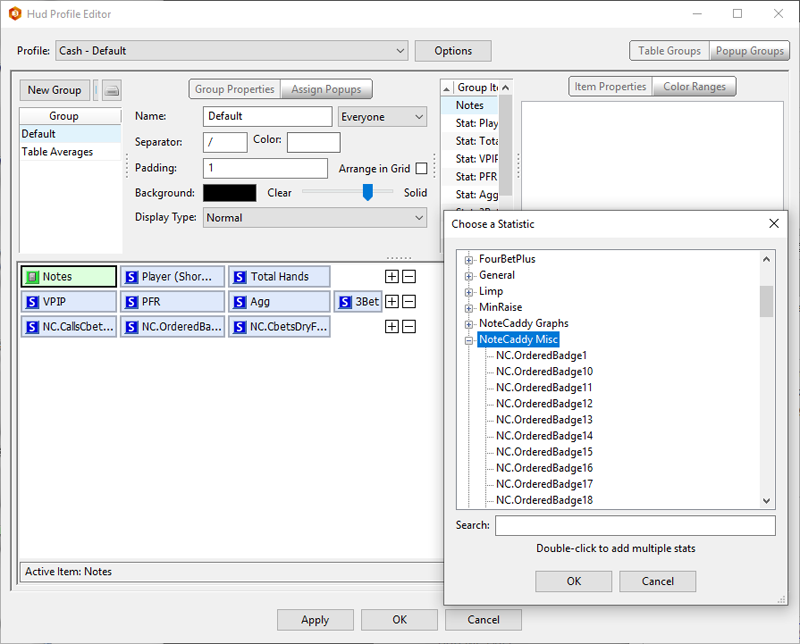
The PlayerOverview is a stat that can be added to a HUD. To add it in HM3 go to HUD → HUD Editor → Choose your HUD Profile → Click on a '+' symbol → Add Statistic → In the Search type in 'PlayerOverview' → Select the stat and click OK.

Once the PlayerOverview stat is added to a HUD there will be a NoteCaddy icon displayed on the HUD. When this NoteCaddy icon is clicked on, the PlayerOverview will open.

A note is eligible to display in the PlayerOverview if it has 'Show in the notes popup' enabled in its Note Definition, in NoteCaddy.

There are also other settings that control how a note displays in the PlayerOverview. These options are in NoteCaddy → File → Settings:
[h3][anchor=nc-how-to-add-nc-stats-to-hud]How Can I Add a NoteCaddy Stat to a HUD or Popup?[/anchor][/h3] Inside the HUD Profile Editor is where you add NoteCaddy stats to your HUD or popups.
[h3][anchor=nc-where-can-i-find-nc-notes]Where Can I Find NoteCaddy Notes?[/anchor][/h3] Once you've added NoteCaddy stats to a HUD profile, all you need to do is use the HUD profile with NoteCaddy notes to see the new NoteCaddy stats, badges, etc.
Clicking a NoteCaddy stat will open a Popup with more NoteCaddy information.
[h3][anchor=nc-types-of-stats]Types of NoteCaddy Stats[/anchor][/h3] NoteCaddy has different ways of displaying the data for each note definition, and which of these you choose to use is up to you, and depends on how you want to lay out your HUD.
The different types of stats can be seen here for the CBetsInPosition note definition.
Here are these stats displayed in a popup in the same order.
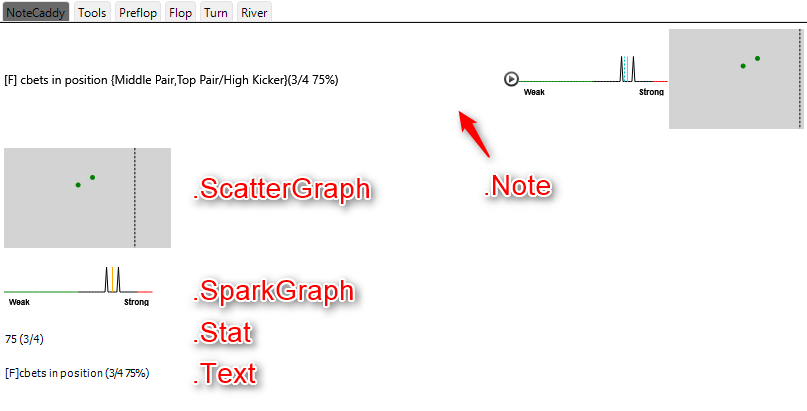
The Note combines a text display of the note information along with the spark graph and scatter graph.
The ScatterGraph and SparkGraph display graphical interpretations of the data and may be included in the HUD individually rather than as part of a 'Note'.
The Stat displays the data as a percentage value, much like most HM3 stats (the times/opportunities display is optional, and is configured by setting the 'Show Times/Opportunities' property in the HUD Editor).
The Text is the text of the note with the street ([F] for flop in this case) and the number and percentage of actions taken (where appropriate).
You can use a mixture of NoteCaddy and Holdem Manager 3 stats within the same HUD group or popup.
[h3] [/h3]
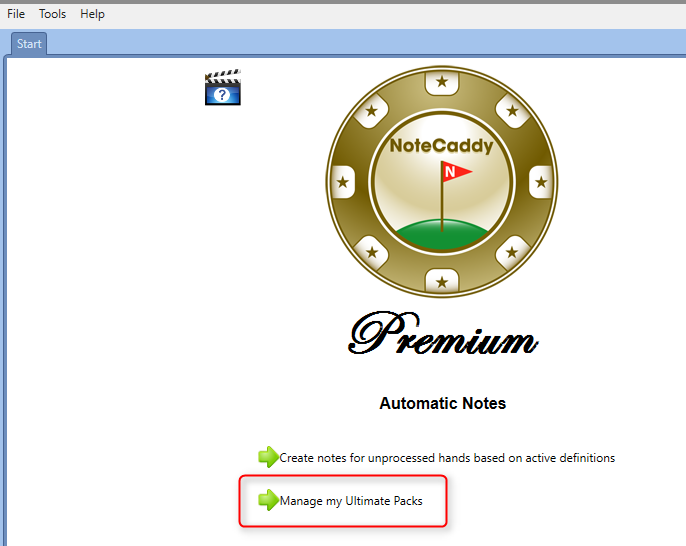
[h3][anchor=nc-add-nc-packs]How Can I Import NoteCaddy Notes or Coaching Packs?[/anchor][/h3] Any coaching packs of note definitions or HUD profiles that are included in NoteCaddy can be installed as part of the Setup Wizard. You can also manage them later using the link on the Start panel in NoteCaddy.
If you download more note definitions or coaching packs you can import them into NoteCaddy manually.
To do this, first open the NoteCaddy window from the Holdem Manager 3 Apps Menu: Holdem Manager 3 → Apps → NoteCaddy → Show NoteCaddy.
From the NoteCaddy menu select Tools → Import, and then select the appropriate option to import your Note Definitions, Color Definitions or Coaching Package.
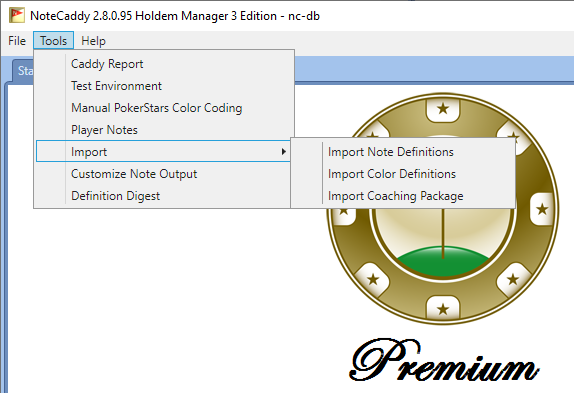
Importing definitions will create pending tasks that will need to be run to create the actual notes, and these notes will then be available in Holdem Manager 3 for inclusion in your own HUD's.
Any HUD profiles included in a coaching pack will be added to Holdem Manager 3 for use at the tables.
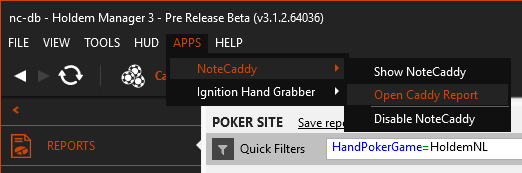
[h3][anchor=nc-caddy-report]Caddy Report - What is it?[/anchor][/h3] The Caddy Report displays recently created notes and hands.
Once NoteCaddy is enabled, go back into the Apps menu, select NoteCaddy, then Open Caddy Report.
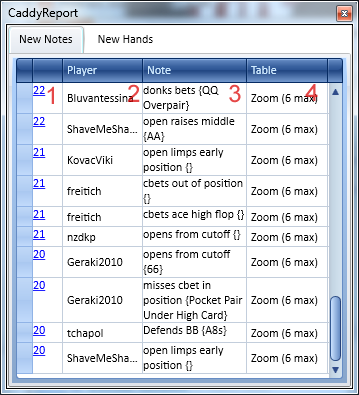
Caddy Report - New Notes
This shows NoteCaddy notes created during the current session.
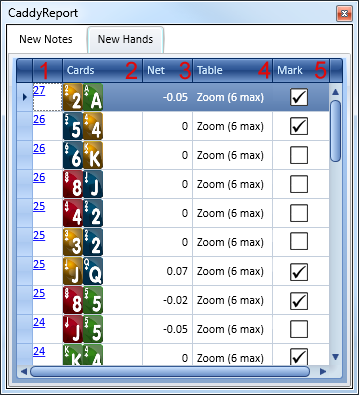
New Hands
New Hands displays all hands that went to showdown.
[h3][anchor=nc-why-so-much-cpu]Why is NoteCaddy Using so Much CPU?[/anchor][/h3] NoteCaddy can be configured to use a different number of threads depending on the balance you prefer between speed and performance.
To reduce the CPU load on your computer reduce the number of threads which NoteCaddy uses on the 'Creating Notes' pane.
Using more threads can be useful when you have a large backlog of hands to process (if you reset and recreate the notes for example), but normally using fewer threads will mean that NoteCaddy uses less processing power, and it will keep up with your live play.
[h3][anchor=The-NoteCaddy-Wiki]The NoteCaddy Wiki[/anchor][/h3]
The NoteCaddy Wiki is a resource page that contains in-depth instructional information about the features of NoteCaddy. It can be found at: wiki.assaultware.com/NoteCaddy.ashx
[url=#nc-open-and-close]Opening and Closing NoteCaddy[/url]
[url=#NoteCaddy-PlayerOverview]NoteCaddy PlayerOverview[/url]
[url=#nc-how-to-add-nc-stats-to-hud]How Can I Add a NoteCaddy Stat to a HUD or Popup[/url]
[url=#nc-where-can-i-find-nc-notes]Where Can I Find NoteCaddy Notes[/url]
[url=#nc-types-of-stats]Types of NoteCaddy Stats[/url]
[url=#nc-add-nc-packs]How Can I Import NoteCaddy Notes or Coaching Packs?[/url]
[url=#nc-caddy-report]Caddy Report - What is it?[/url]
[url=#nc-why-so-much-cpu]Why is NoteCaddy Using so Much CPU?[/url]
[url=#The-NoteCaddy-Wiki]The NoteCaddy Wiki[/url]
[h3][anchor=nc-what-is-notecaddy]What is NoteCaddy?[/anchor][/h3] Opponent stats and notes can sometimes be overwhelming and we have a limited amount of time to process them. NoteCaddy solves this problem by deeply analyzing your hand histories and then combining all the data into a highly visual output.
Essentially NoteCaddy helps you absorb a lot of information in a short amount of time.
For Example:
Instead of trying to filter through 45 notes trying to find out what hands this opponent showed down when he 3bet on the BB vs the SB, NoteCaddy conveniently combines all that data into a concise note. NoteCaddy details the hole-card range (on the left), and on the right side the CaddySpark graph indicates how likely the hand is to be strong or weak when this player makes this action.
[h3][anchor=nc-open-and-close]Opening and Closing NoteCaddy[/anchor][/h3] To open the main NoteCaddy interface where you can create custom stats, badges, etc, click the Holdem Manager 3 Apps menu, then click Show NoteCaddy.
You can also disable NoteCaddy in this same menu.
[h3][anchor=NoteCaddy-PlayerOverview]NoteCaddy PlayerOverview[/anchor][/h3] The PlayerOverview contains the Main CaddyScatter Graph and notes that are eligible to be displayed on it.
The PlayerOverview is a stat that can be added to a HUD. To add it in HM3 go to HUD → HUD Editor → Choose your HUD Profile → Click on a '+' symbol → Add Statistic → In the Search type in 'PlayerOverview' → Select the stat and click OK.
Once the PlayerOverview stat is added to a HUD there will be a NoteCaddy icon displayed on the HUD. When this NoteCaddy icon is clicked on, the PlayerOverview will open.
A note is eligible to display in the PlayerOverview if it has 'Show in the notes popup' enabled in its Note Definition, in NoteCaddy.
There are also other settings that control how a note displays in the PlayerOverview. These options are in NoteCaddy → File → Settings:
- HUD → 'Maximum amount of notes in the note hud popup' - If you have 10 note definitions and you want all of them to be eligible to display, you would enter 10 in this field.
- Note Settings → Sorting - This controls the order that the notes will appear in the PlayerOverview.
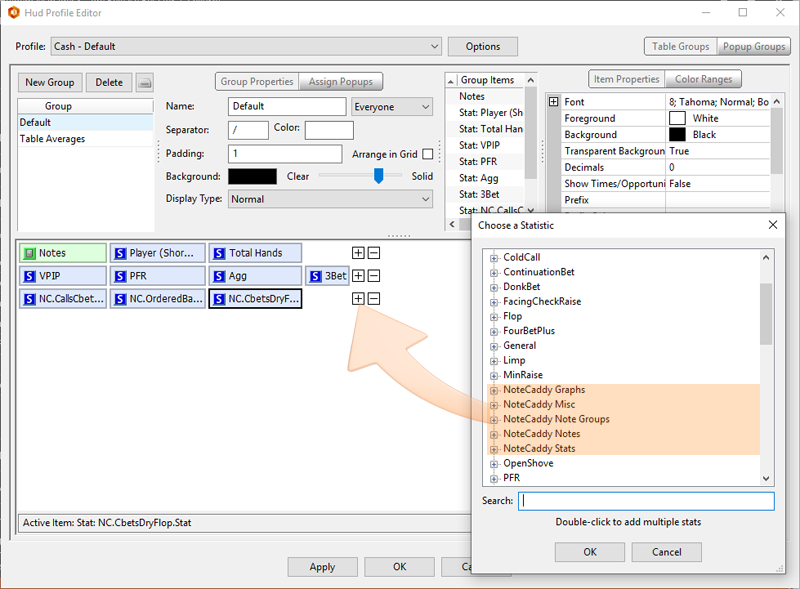
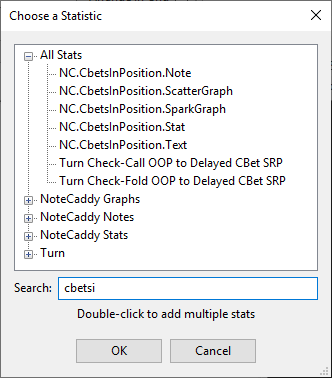
[h3][anchor=nc-how-to-add-nc-stats-to-hud]How Can I Add a NoteCaddy Stat to a HUD or Popup?[/anchor][/h3] Inside the HUD Profile Editor is where you add NoteCaddy stats to your HUD or popups.
- Click the plus sign.
- Select and click 'Add Stat'.
- Pick a NoteCaddy stat from the highlighted categories shown in the above screen to add the stat to your HUD or Popup.
[h3][anchor=nc-where-can-i-find-nc-notes]Where Can I Find NoteCaddy Notes?[/anchor][/h3] Once you've added NoteCaddy stats to a HUD profile, all you need to do is use the HUD profile with NoteCaddy notes to see the new NoteCaddy stats, badges, etc.
Clicking a NoteCaddy stat will open a Popup with more NoteCaddy information.
[h3][anchor=nc-types-of-stats]Types of NoteCaddy Stats[/anchor][/h3] NoteCaddy has different ways of displaying the data for each note definition, and which of these you choose to use is up to you, and depends on how you want to lay out your HUD.
The different types of stats can be seen here for the CBetsInPosition note definition.
Here are these stats displayed in a popup in the same order.
The Note combines a text display of the note information along with the spark graph and scatter graph.
The ScatterGraph and SparkGraph display graphical interpretations of the data and may be included in the HUD individually rather than as part of a 'Note'.
The Stat displays the data as a percentage value, much like most HM3 stats (the times/opportunities display is optional, and is configured by setting the 'Show Times/Opportunities' property in the HUD Editor).
The Text is the text of the note with the street ([F] for flop in this case) and the number and percentage of actions taken (where appropriate).
Note: In Holdem Manager 3 all of these different types are referred to as "statistics" (or 'stats'), whether they display a note, a statistic or a graph.Not all types are available for all note definitions as they are determined by the type of data that the note generates.
You can use a mixture of NoteCaddy and Holdem Manager 3 stats within the same HUD group or popup.
Note: NoteCaddy does not use the 'Number of Players Filtered' settings from Holdem Manager 3's HUD Options, or the HUD's position property, so these need to be defined in NoteCaddy itself for NoteCaddy stats.
[h3] [/h3]
[h3][anchor=nc-add-nc-packs]How Can I Import NoteCaddy Notes or Coaching Packs?[/anchor][/h3] Any coaching packs of note definitions or HUD profiles that are included in NoteCaddy can be installed as part of the Setup Wizard. You can also manage them later using the link on the Start panel in NoteCaddy.
If you download more note definitions or coaching packs you can import them into NoteCaddy manually.
To do this, first open the NoteCaddy window from the Holdem Manager 3 Apps Menu: Holdem Manager 3 → Apps → NoteCaddy → Show NoteCaddy.
From the NoteCaddy menu select Tools → Import, and then select the appropriate option to import your Note Definitions, Color Definitions or Coaching Package.
Importing definitions will create pending tasks that will need to be run to create the actual notes, and these notes will then be available in Holdem Manager 3 for inclusion in your own HUD's.
Any HUD profiles included in a coaching pack will be added to Holdem Manager 3 for use at the tables.
[h3][anchor=nc-caddy-report]Caddy Report - What is it?[/anchor][/h3] The Caddy Report displays recently created notes and hands.
Once NoteCaddy is enabled, go back into the Apps menu, select NoteCaddy, then Open Caddy Report.
Caddy Report - New Notes
This shows NoteCaddy notes created during the current session.
- Hand Occurrence Time - Displays the minutes of the hour that the hand occurred. A hand that happened at 8:46 would show 46. Click on any number to launch the applicable hand in the Holdem Manager 3 Replayer.
- Player - Displays the name of the player the note applies to.
- Note - Displays the NoteCaddy note created.
- Table - Displays the table that the note applies to.
New Hands
New Hands displays all hands that went to showdown.
- Session Hand Number - Displays the hand number for the current session. Click on any hand number, to launch the applicable hand in the Replayer window
- Cards - Displays the hole cards that went to showdown
- Net - Displays how much the player with those hole cards lost or won
- Table - Displays the table that the note applies to
- Mark - Quickly mark the hand. Simply check or uncheck to mark or unmark the hand. Review it in reports by selecting the show marked hands option.
- Board - Displays the community cards for the hand.
- Winner - Displays the winner of the hand.
- Cards - Displays the winning hole cards. (If available)
[h3][anchor=nc-why-so-much-cpu]Why is NoteCaddy Using so Much CPU?[/anchor][/h3] NoteCaddy can be configured to use a different number of threads depending on the balance you prefer between speed and performance.
To reduce the CPU load on your computer reduce the number of threads which NoteCaddy uses on the 'Creating Notes' pane.
Using more threads can be useful when you have a large backlog of hands to process (if you reset and recreate the notes for example), but normally using fewer threads will mean that NoteCaddy uses less processing power, and it will keep up with your live play.
[h3][anchor=The-NoteCaddy-Wiki]The NoteCaddy Wiki[/anchor][/h3]
The NoteCaddy Wiki is a resource page that contains in-depth instructional information about the features of NoteCaddy. It can be found at: wiki.assaultware.com/NoteCaddy.ashx
[h1]Color Coding Overview[/h1]
Make sure you have set up your notes file in NoteCaddy by going to File → Settings → Color Settings. It is the file named notes.yourScreenName.xml for PokerStars. This file is often located in one of these directories:
Colors will be added to your PokerStars client for each player that meets the criteria of at least one color definition. These color definitions are always listed in the NoteCaddy client. You can edit them and/or add more of them.
If a player meets more than one criteria, NoteCaddy will assign the color of the definition with higher priority. Keep in mind that for priority, 2 > 1 so it is the number that is literally bigger. Any color definition that has "exclude from color coding" specified will be ignored.
Furthermore, any color definition that doesn't have a color specified will be ignored.
The drop down lists that contain the colors for each site will only appear if a notes file is configured for it via File → Settings → Color Settings.
You can test how many people will get a certain color by right clicking the Color Definition and clicking "Seek". This also works if you select multiple colors (either using shift or CTRL) and run seek on them.
For further testing and troubleshooting instructions, please see Color coding not working as expected? Read this.
To create the actual colors, click the highlighted text on the start panel. (See image below.)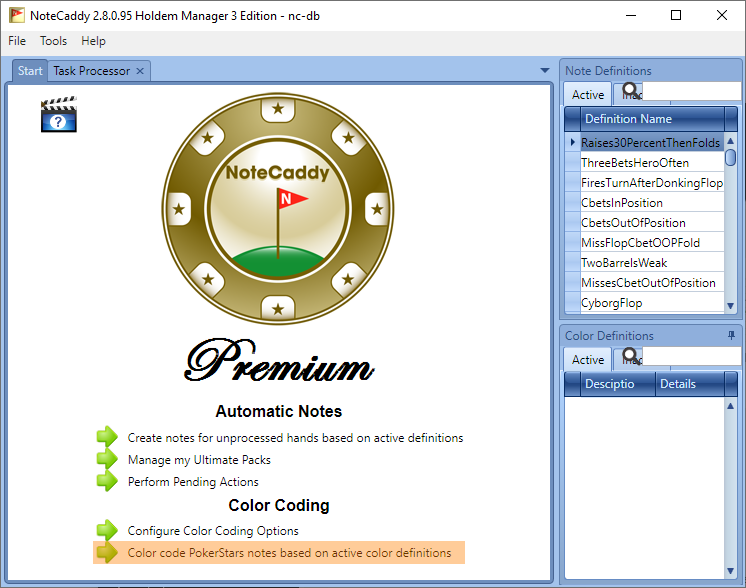
- C:\Users\[YourWindowsUsername]\AppData\Local\PokerStars
- C:\Program Files(x86)\PokerStars
Note: You must create at least one standard text note in the PokerStars client for a .xml note file to be created.
Colors will be added to your PokerStars client for each player that meets the criteria of at least one color definition. These color definitions are always listed in the NoteCaddy client. You can edit them and/or add more of them.
If a player meets more than one criteria, NoteCaddy will assign the color of the definition with higher priority. Keep in mind that for priority, 2 > 1 so it is the number that is literally bigger. Any color definition that has "exclude from color coding" specified will be ignored.
Furthermore, any color definition that doesn't have a color specified will be ignored.
The drop down lists that contain the colors for each site will only appear if a notes file is configured for it via File → Settings → Color Settings.
You can test how many people will get a certain color by right clicking the Color Definition and clicking "Seek". This also works if you select multiple colors (either using shift or CTRL) and run seek on them.
For further testing and troubleshooting instructions, please see Color coding not working as expected? Read this.
To create the actual colors, click the highlighted text on the start panel. (See image below.)
You have to run this process whenever you want the colors to be updated. The PokerStars client must be closed for this process to run. That means it must be closed when you start the process and remain closed until it has completed. If PokerStars is open, the changes will be lost when you close it.
CaddySpark and CaddyScatter graphs are not allowed to be used during live play on PokerStars and full tilt poker. They will still appear on the replayer (if the poker client is closed) and when viewing note history within NoteCaddy. Please see new PokerStars software rules. Please email any questions to support@pokerstars.com[h1]
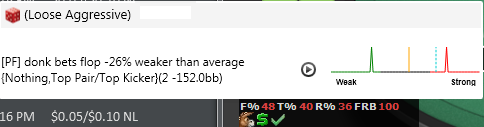
CaddySpark Overview[/h1] CaddySpark is a technology used in NoteCaddy that will show a sparkline graph as part of a NoteCaddy note.

An example of a CaddySpark graph in a note. This player is significantly stronger than the player pool average in this situation
The purpose of a CaddySpark graph is to allow users to absorb a large amount of data in a very small time frame. The green, black, and red spikes indicate strengths that a player had in hands for which a note was taken. A higher line indicates that the player was this strong more times. The dotted blue line indicates the average strength of the player pool for this same note. The orange line indicates the average strength of the individual player again.
A quick analysis of the CaddySpark above shows that this player performed the action with a range that is stronger than average. His range is heavily weighted towards stronger hands with a few thin value bets and bluffs mixed in. Given the information from this spark graph, an argument can be made that we should assume he is probably holding a strong hand when this action is observed.
A spark graph can be added for any note definition as long as it uses exactly one of the following variables: $cardrange, $flophandrange, $turnhandrange, $riverhandrange. There is an option in the "HUD Options" panel of the definition editor that says "Use CaddySpark". Make sure that option is checked and the graphs will appear. [h1]Customizing Settings[/h1] The CaddySpark graph allows for the following customization's. These are found in File->Settings->HUD
- The blue player pool strength line can be removed
- The minimum amount of required spark points can be set. You would set this if you don't want a spark graph to appear for a small sample size
CaddySpark and CaddyScatter graphs are not allowed to be used during live play on PokerStars. They will still appear on the replayer (if the poker client is not open) and when viewing note history within NoteCaddy.[h1]
CaddyScatter Overview[/h1] CaddyScatter is a technology used in NoteCaddy to help make bet size reads on opposing players. The theory is that some players will, for example, bet bigger with weaker hands and smaller with strong hands, or vice-versa. Since NoteCaddy carefully follows all actions performed, it is able to make a scattergraph where the X-axis corresponds to a bet/raise size and the Y-axis corresponds to the strength of the hand. This strength is calculated using NoteCaddy General Strength.

Each time an action is observed and a player eventually shows down, a dot is drawn in the graph. The color of the dots and the size of the graph itself are configurable in NoteCaddy via File → Settings → CaddyScatter. It is possible to remove all the dots from the graph, with the exception of a particular street, quite easily. The buttons on the right of the graph will do so. Clicking the 'x' on the bottom right will reset the graph.
A point towards the top of the graph indicates a strong hand. A point towards the right indicates a bigger bet size. As a point of reference, the dotted line is drawn which indicates what would have been a pot-sized bet. Given the above graph, we could conclude that the pre-flop open raises (light red dots), are made bigger with stronger hands, and as the hands get weaker, so does the raise size.
One thing to keep in mind is for pre-flop, a "bet" refers to an open raise and a "raise" refers to a re-raise.
[h1]Enabling CaddyScatter[/h1] The CaddyScatter can be enabled in NoteCaddy → File → Settings → CaddyScatter.
If the CaddyScatter was changed from disabled to enabled, then you will be prompted to reset and reprocess your notes. This is necessary for the CaddyScatter to populate for previously imported hands.
When the CaddyScatter is enabled, it can appear by clicking on the PlayerOverview stat in the HUD. The NC.PlayerOverview stat must be added to the HUD in the HoldemManager3 HUD Editor to use the main CaddyScatter. [h1]Pot Size Bet[/h1] The way a pot size bet is calculated is based on the traditional formula which can be found on this page.
Some examples are quoted here in case that page goes offline:
Example 1: There's $10 in the pot. You're first to act. In this case you can bet $10.
Example 2: There's $10 in the pot and a player has bet $3. To calculate your maximum bet, first pretend that you call that last bet. The total pot then contains 10 + 3 + 3 = $16. This is your maximum raise. With the $3 call, your total maximum bet would be $19.
Example 3: There's $10 in the pot, one player has bet $3 and another player has raised to $10. First pretend that you call the last bet of $10. The pot then contains 10 + 3 + 10 + 10 = $33. Your pot raise is $33, and your total bet is $43.
[h1]NoteCaddy Badges[/h1]
Please see the NoteCaddy Badges FAQ for extensive instructions on working with and using badges.
[url=#nc-represent-note-w-badge]How to Represent a Note With a Badge[/url]
[url=#nc-add-badges-to-hud]Adding Badges to Your HUD[/url]
When playing multiple tables, it can be difficult to read a player's notes quickly and effectively without slowing down the action too much. The purpose of NoteCaddy badges is to display an image directly in a player's HUD when a very important note has been taken. This way, a NoteCaddy user can be alerted to his enemies' most important idiosyncrasies without having to hover over a note icon or stat.
For example, badges can be used to display notes that differentiate a player from average. The popup in the image above describes why this player got the donkey badge. It is because he has shown weak hands when donk-betting. A badge can be created for anything a NoteCaddy user wishes to know quickly.
[h3][anchor=nc-represent-note-w-badge]How to Represent a Note With a Badge[/anchor][/h3] There are two ways to make a note appear as a badge. The first way is to select a badge in the definition editor on the General screen.

This method is the recommended way to display badges for Deviations from Average. In the 'Advanced' tab of a Note Definition is where the settings exist to create these types of badges.
The second way to create a badge is with the help of Color Definitions. To create a badge from a Color Definition, you would create a new Color Definition. In this Color Definition you can apply the Badge icon and statistics you require for the badge to appear.
Color Definitions are useful to use as a badges because they do not require the NoteCaddy notes to be reset and reprocessed for their changes to take effect.
[h3][anchor=nc-add-badges-to-hud]Adding Badges to Your HUD[/anchor][/h3]
NC.OrderedBadges will display badges on the HUD according to 'Priority' that is set in their Note/Color Definition. Badges with a higher 'Priority' number will appear before a lower 'Priority' number (2 appears ahead of 1).
NC.PrefixedBadges take into account the 'Prefix' which is given to the Note/Color Definition. For instance, if we give all pre-flop badges the 'Prefix' "PRE", then we will have an option to use NC.PrefixedBadge.PRE1, NC.PrefixedBadge.PRE2, etc. This can be useful to make sure certain badges get placed exactly where you prefer them.
Please see the NoteCaddy Badges FAQ for extensive instructions on working with and using badges.
[url=#nc-represent-note-w-badge]How to Represent a Note With a Badge[/url]
[url=#nc-add-badges-to-hud]Adding Badges to Your HUD[/url]
When playing multiple tables, it can be difficult to read a player's notes quickly and effectively without slowing down the action too much. The purpose of NoteCaddy badges is to display an image directly in a player's HUD when a very important note has been taken. This way, a NoteCaddy user can be alerted to his enemies' most important idiosyncrasies without having to hover over a note icon or stat.
For example, badges can be used to display notes that differentiate a player from average. The popup in the image above describes why this player got the donkey badge. It is because he has shown weak hands when donk-betting. A badge can be created for anything a NoteCaddy user wishes to know quickly.
[h3][anchor=nc-represent-note-w-badge]How to Represent a Note With a Badge[/anchor][/h3] There are two ways to make a note appear as a badge. The first way is to select a badge in the definition editor on the General screen.
This method is the recommended way to display badges for Deviations from Average. In the 'Advanced' tab of a Note Definition is where the settings exist to create these types of badges.
The second way to create a badge is with the help of Color Definitions. To create a badge from a Color Definition, you would create a new Color Definition. In this Color Definition you can apply the Badge icon and statistics you require for the badge to appear.
Color Definitions are useful to use as a badges because they do not require the NoteCaddy notes to be reset and reprocessed for their changes to take effect.
[h3][anchor=nc-add-badges-to-hud]Adding Badges to Your HUD[/anchor][/h3]
- Open the Holdem Manager 3 HUD Profile Editor.
- Click the "+" sign next to a HUD Stat row.
- Click "Add Stat."
- The "NoteCaddy Misc" section displays all NoteCaddy Badges (See Image Above).
- Add a badge to your HUD just like you would a standard stat, by double-clicking the badge in the list. Each badge slot should be given a different number (ie. NC.OrderedBadge1, NC.OrderedBadge2, etc.). This will ensure badges are not duplicated.
NC.OrderedBadges will display badges on the HUD according to 'Priority' that is set in their Note/Color Definition. Badges with a higher 'Priority' number will appear before a lower 'Priority' number (2 appears ahead of 1).
NC.PrefixedBadges take into account the 'Prefix' which is given to the Note/Color Definition. For instance, if we give all pre-flop badges the 'Prefix' "PRE", then we will have an option to use NC.PrefixedBadge.PRE1, NC.PrefixedBadge.PRE2, etc. This can be useful to make sure certain badges get placed exactly where you prefer them.
[h1]Note Groups[/h1]
NoteCaddy Note Groups are groups of Definitions that can be added to HM3 HUD Popups. Instead of needing to add each individual note to a Popup, definitions can be assigned to a Note Group, which can then be added to the Popup.
To create a Note Group in NoteCaddy click File → Edit Note Groups.

Add the name of the Note Group(s), one per line, and click OK.

To assign a note to a Note Group, open the Note Definition in NoteCaddy by double-clicking on it. Click on the tab named HUD Options. In the ‘Show in Note Group’ drop-down box you can assign the Note Group to the definition. Click File → Save (or Ctrl+S) to save your changes.

A Note Group can be added to a HM3 Popup by going to the Hud Profile Editor (HM3 → HUD → HUD Editor), select your Profile, then click on Popup Groups. Choose the Popup you’d like to place your Note Group onto. Select a '+' sign and choose 'Add Statistic'. Scroll to find the 'NoteCaddy Note Groups' section and choose your Note Group. Click OK, and then Apply your changes.

If your Popup is arranged in a Grid style, it’s good practice to assign the Note Group more Column Span, so that it fits well in your grid.

To create a Note Group in NoteCaddy click File → Edit Note Groups.
Add the name of the Note Group(s), one per line, and click OK.
To assign a note to a Note Group, open the Note Definition in NoteCaddy by double-clicking on it. Click on the tab named HUD Options. In the ‘Show in Note Group’ drop-down box you can assign the Note Group to the definition. Click File → Save (or Ctrl+S) to save your changes.
A Note Group can be added to a HM3 Popup by going to the Hud Profile Editor (HM3 → HUD → HUD Editor), select your Profile, then click on Popup Groups. Choose the Popup you’d like to place your Note Group onto. Select a '+' sign and choose 'Add Statistic'. Scroll to find the 'NoteCaddy Note Groups' section and choose your Note Group. Click OK, and then Apply your changes.
If your Popup is arranged in a Grid style, it’s good practice to assign the Note Group more Column Span, so that it fits well in your grid.
[h1]NoteCaddy PlayerOverview Stat[/h1]
The PlayerOverview contains the Main CaddyScatter Graph and notes that are eligible to be displayed on it.
The PlayerOverview is a stat that can be added to a HUD. To add it into a HM3 HUD, go to HUD → HUD Editor → Choose your HUD Profile → Click on a '+' symbol → Add Statistic → In the Search type in 'PlayerOverview' → Select the stat and click OK.
Once the PlayerOverview stat is added to a HUD there will be a NoteCaddy icon displayed on the HUD. When this NoteCaddy icon is clicked on, the PlayerOverview will open.
A note is eligible to display in the PlayerOverview if it has 'Show in the notes popup' enabled in its Note Definition, in NoteCaddy.
There are also other settings that control how a note displays in the PlayerOverview. These options are in NoteCaddy → File → Settings:
- HUD → 'Maximum amount of notes in the note hud popup' - If you have 10 note definitions and you want all of them to be eligible to display, you would enter 10 in this field.
- Note Settings → Sorting - This controls the order that the notes will appear in the PlayerOverview.